When talking about ways to lower your food budget, one thing that comes up over and over again is making your own bread. It is true, making your own bread is cheaper than buying it. However, the reason I make bread has little to do with price and everything to do with quality. I like baking bread because I can control what goes into it. When I make bread there is no high fructose corn syrup, malt coloring, or artificial anything, just flour, water, yeast, salt, sugar (or honey) and occasionally milk and/or butter. I usually use half whole wheat flour (that I grind myself - don't I sound all pioneer woman-y?) so my family is getting some whole grains. But this isn't the real reason I bake bread.
The real reason I bake bread? Because it makes me feel so good. I love watching it rise. I love the smell my house fills with as it bakes. I love taking those warm, brown, fragrant loaves out of the oven. I love slicing into a still warm loaf and having that yeasty smell smack me in the face. I love spreading real butter on that still warm slice and eating it. Oh goodness - I'm filling with warm fuzzies just typing this. It isn't just the taste, it is the whole sensory experience! But a lot of people don't seem to know how to bake bread, or think that it is this labor intensive, complicated, scary process that only us pioneer woman-y types can master. Here's a secret . . . bread baking isn't hard! It is very forgiving and while you do have to let it rise, the actual hands-on time is minimal, especially if you have a heavy -duty mixer. (Oh, and the other secret is I'm not really all that pioneer woman-y, I just like to let you all think I am!)
So here it is, with photo illustrations taken by me: Bread Making 101.
The recipe I used for these loaves of bread is Grandma Bread from the Chickens in The Road blog. I highly recommend her blog and her recipes. This bread is amazing.
Mix in a bowl:
2 1/2 c. warm water
1 package yeast (2 1/4 tsp if using bulk yeast)
1/2 tsp salt
1/3 c. sugar (I used a little less, I didn't want it too sweet)
When you mix it up (I use a wire whisk) it should look like this:
 Now, let me say one thing. I am working on this whole photography thing. Tali won't give me lessons and I'm not very good. I'm getting better, honest! Just go with me on this and pretend you can tell what this looks like, 'kay?
Let this sit for about 5 or 10 minutes and it should look like this:

Go with me again, pretend this looks foamy and frothy.
Next add:
5 1/2 - 6 cups flour (I used about half whole wheat)
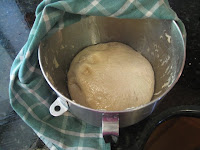
Then knead it. This is easy if you have a heavy-duty mixer. My KitchenAid stand mixer does this beautifully. Just turn it on and let it go for 5-10 minutes. This amount of flour is approximate. Depending on lots of different things, you may need more or less flour. Just make sure you add enough that the dough stays together and isn't too sticky. If you don't have a mixer, stir in the first few cups with a wooden spoon then turn it out on a flat surface and sprinkle the rest on top. Then get your hands in there and work it baby! Smoosh it flat then fold it over, twist it clockwise half a turn then smoosh it again. Keep doing this over and over again until the dough is smooth and elastic. Then put the whole thing in a greased bowl (a big bowl, this stuff will expand!) It will look like this:

This picture actually looks like what it is supposed to - see I told you I was getting better!
Next cover the bowl with a towel and place in a somewhat warm place. I usually turn my oven on for 5 minutes while I'm kneading then turn it off and place the dough in. It gets warm in that time but not hot. You can just put it on top of the refrigerator, on the counter, where ever, just not the fridge!
Next, go do something else. You are waiting for the dough to double in size. It should take about an hour or so. Go watch Oprah. Go clean your bathtub. Go to the grocery store. Just come back in an hour or so and check your bread. When it is ready to go it should look like this:

That looks twice as big, right? Now punch it down. Just punch it with your fist - think of someone you'd like to hit, but can't. Turn the now deflated dough on a flat surface and knead once or twice. Divide it into two relatively even pieces and shape them into a loaf shape - don't worry about how it looks, just make it relatively oblong and smooth and plop them into two greased loaf pans. They will look like this:

Then cover them up and go do something else for awhile. You want them to be - wait for it - twice the size! They should look like this:

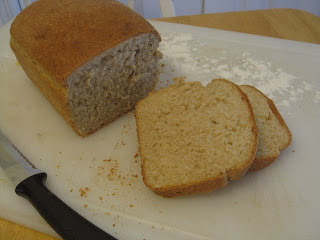
Those pictures just keep getting better and better, too bad the kitchen in the background doesn't get cleaner and cleaner! Place these lovely ladies in a 350 degree oven and bake for 25-30 minutes. They should be golden brown and sound hollow when you tap them. If you want to get all domestic on us, you can use an instant-read thermometer and when it reaches 190 degrees or so in the center, they are ready. Then take them out and put them on a wire rack to cool. Take them out of the pans as soon as you can because the steam will be trapped in there and make the bottom crusts tough. They should look like this:
 Next you just slice them and eat them. Try not to moan as you eat that first bite, your children will tease you forever if you do. Enjoy!
Jill
2 comments:
I'll have to have my Mom try to make the bread! It looks soooooooooooooooooooooooooooooooooooooooooo GOOD!!!!
You talk her into it. Homemade bread is really, really good! And tell her it is not that hard! She'll do it for you, just make a cute face and say "Pretty please?"
Thanks for reading my blog and for your comments!
Jill
Post a Comment